Hello!
As promised in my last blog post I have my latest manicure to show you - blossoms and a Japanese money cat!
To get inspiration for this manicure I basically reached into my box of stamping plates and pulled out a random one, which turned out to be MoYou's Suki 17. This is a gorgeous plate featuring very intricate Japanese designs. I hadn't yet used the money cat image so I decided that the time was now! I used my MoYou stamping mat to make decals - one of the cat and the rest blossom flowers - and applied them over the light grey Ion by Sally Hansen.
I've been very tired but I am glad that I got this manicure done and photographed! Now to find inspiration for my next design... ^_^
Hugs,
Lisa xx
Showing posts with label Sally Hansen. Show all posts
Saturday, 11 March 2017
Wednesday, 4 November 2015
Metallic Hearts Manicure
Hello!
Last night I cut my nails short as I fancied a change ^_^ Whenever I do this I get the urge to have something cute on my nails, so this time I went for a blue heart manicure and darkened it up a bit since it's November!
I started off with a base of Sally Hansen's Navy Baby and used my Born Pretty Store BP-L013 stamping plate to add a pattern of little hearts. My stamping polish was Models Own's Chrome Blue. Here it is!
Apologies for the slightly late blog post today - it's a combination of me not feeling very well and there being less hours of daylight in which to take photos outside!
Hugs,
Lisa xx
Last night I cut my nails short as I fancied a change ^_^ Whenever I do this I get the urge to have something cute on my nails, so this time I went for a blue heart manicure and darkened it up a bit since it's November!
I started off with a base of Sally Hansen's Navy Baby and used my Born Pretty Store BP-L013 stamping plate to add a pattern of little hearts. My stamping polish was Models Own's Chrome Blue. Here it is!
Apologies for the slightly late blog post today - it's a combination of me not feeling very well and there being less hours of daylight in which to take photos outside!
Hugs,
Lisa xx
Labels:
Born pretty store,
Models Own,
nail art,
Sally Hansen,
stamping
Friday, 18 September 2015
Geordie Nails Autumn Week ~ Hidden Treasure & Spiced Plum
Hello!
This is the second post for my Autumn Week of manicures. As luck would have it I was ill all of yesterday so couldn't get any painting or blogging done, but here I am!
This manicure consists of two old favourite polishes and I'd forgotten just how much I love them, especially together! I first wore this mani four years ago. Spiced Plum is by Seventeen at Boots and it's a glossy, brown-leaning purple. I think the years have turned the shade slightly more brown, but it's still wearable. Hidden Treasure is a flakie glitter by Sally Hansen; I seem to remember it being the polish of the moment at one time!
Here is a close-up of that flakie goodness...
...and here is Spiced Plum on its own:
Hopefully I'll be well enough to keep the Autumn manicures coming!
Hugs,
Lisa xx
This is the second post for my Autumn Week of manicures. As luck would have it I was ill all of yesterday so couldn't get any painting or blogging done, but here I am!
This manicure consists of two old favourite polishes and I'd forgotten just how much I love them, especially together! I first wore this mani four years ago. Spiced Plum is by Seventeen at Boots and it's a glossy, brown-leaning purple. I think the years have turned the shade slightly more brown, but it's still wearable. Hidden Treasure is a flakie glitter by Sally Hansen; I seem to remember it being the polish of the moment at one time!
Here is a close-up of that flakie goodness...
...and here is Spiced Plum on its own:
Hopefully I'll be well enough to keep the Autumn manicures coming!
Hugs,
Lisa xx
Friday, 7 August 2015
Another Stormy Seas Manicure!
Hello!
My Stormy Seas idea is a manicure I've worn once or twice before, and I thought now would be a good time to wear it again while my nails are nice and long!
This mani uses the clingfilm technique and the colours light grey and dark blue, namely Sally Hansen Ion and Barry M Blackberry. For this technique you paint your nails one colour and let them dry fully. Then you paint your second colour on top, one nail at a time, and while it's wet you dab at it with scruched up clingfilm (a.k.a. Saran wrap, Glad wrap). Top coat makes it look all lovely!
After I'd worn the mani a couple of days I added some feathered gold stamping on top using my new MoYou Kitty plate, just to see what it'd look like - and it was a nice touch, although I think the Stormy Seas mani is enough on its own!
Hugs,
Lisa xx
My Stormy Seas idea is a manicure I've worn once or twice before, and I thought now would be a good time to wear it again while my nails are nice and long!
This mani uses the clingfilm technique and the colours light grey and dark blue, namely Sally Hansen Ion and Barry M Blackberry. For this technique you paint your nails one colour and let them dry fully. Then you paint your second colour on top, one nail at a time, and while it's wet you dab at it with scruched up clingfilm (a.k.a. Saran wrap, Glad wrap). Top coat makes it look all lovely!
After I'd worn the mani a couple of days I added some feathered gold stamping on top using my new MoYou Kitty plate, just to see what it'd look like - and it was a nice touch, although I think the Stormy Seas mani is enough on its own!
Hugs,
Lisa xx
Labels:
Barry M,
MoYou,
nail art,
Sally Hansen,
stamping
Thursday, 30 July 2015
Pusheen Manicure
Hello!
OK I am SUPER happy with this new MoYou stamping plate of mine, Suki 03. It has lots of little kawaii bits and bobs - sushi, sweets, animal faces, veg, all ready to be stamped on their own, leadlit or turned into decals. Most importantly for this manicure it has Pusheen the cat!!! I adore Pusheen so she had to be the first to go on my nails.
I tried to recreate the style of Pusheen so went for a light grey base, a layer of light holographic stamping in a cute doodle pattern, then my main stamping in black. I used Sally Hansen Ion for the base, Gosh Holographic Hero and MoYou plate Princess 11 for the under-stamping, and Konad Black and Moyou Suki 03 for the main stamping. I also topped off my mani with a few tattoos from my MoYou Hipster hand tattoo pack!
I've only just finished this manicure but I was in such a rush to blog about it because it's making me really happy to look at! It's funny, I have so many stamping plates with gorgeous, intricate patterns that I love - but sometimes you just need something simple and cute to put a huge smile on your face.
Hugs,
Lisa xx
OK I am SUPER happy with this new MoYou stamping plate of mine, Suki 03. It has lots of little kawaii bits and bobs - sushi, sweets, animal faces, veg, all ready to be stamped on their own, leadlit or turned into decals. Most importantly for this manicure it has Pusheen the cat!!! I adore Pusheen so she had to be the first to go on my nails.
I tried to recreate the style of Pusheen so went for a light grey base, a layer of light holographic stamping in a cute doodle pattern, then my main stamping in black. I used Sally Hansen Ion for the base, Gosh Holographic Hero and MoYou plate Princess 11 for the under-stamping, and Konad Black and Moyou Suki 03 for the main stamping. I also topped off my mani with a few tattoos from my MoYou Hipster hand tattoo pack!
I've only just finished this manicure but I was in such a rush to blog about it because it's making me really happy to look at! It's funny, I have so many stamping plates with gorgeous, intricate patterns that I love - but sometimes you just need something simple and cute to put a huge smile on your face.
Hugs,
Lisa xx
Tuesday, 26 May 2015
Nails with Charm!
Hello!
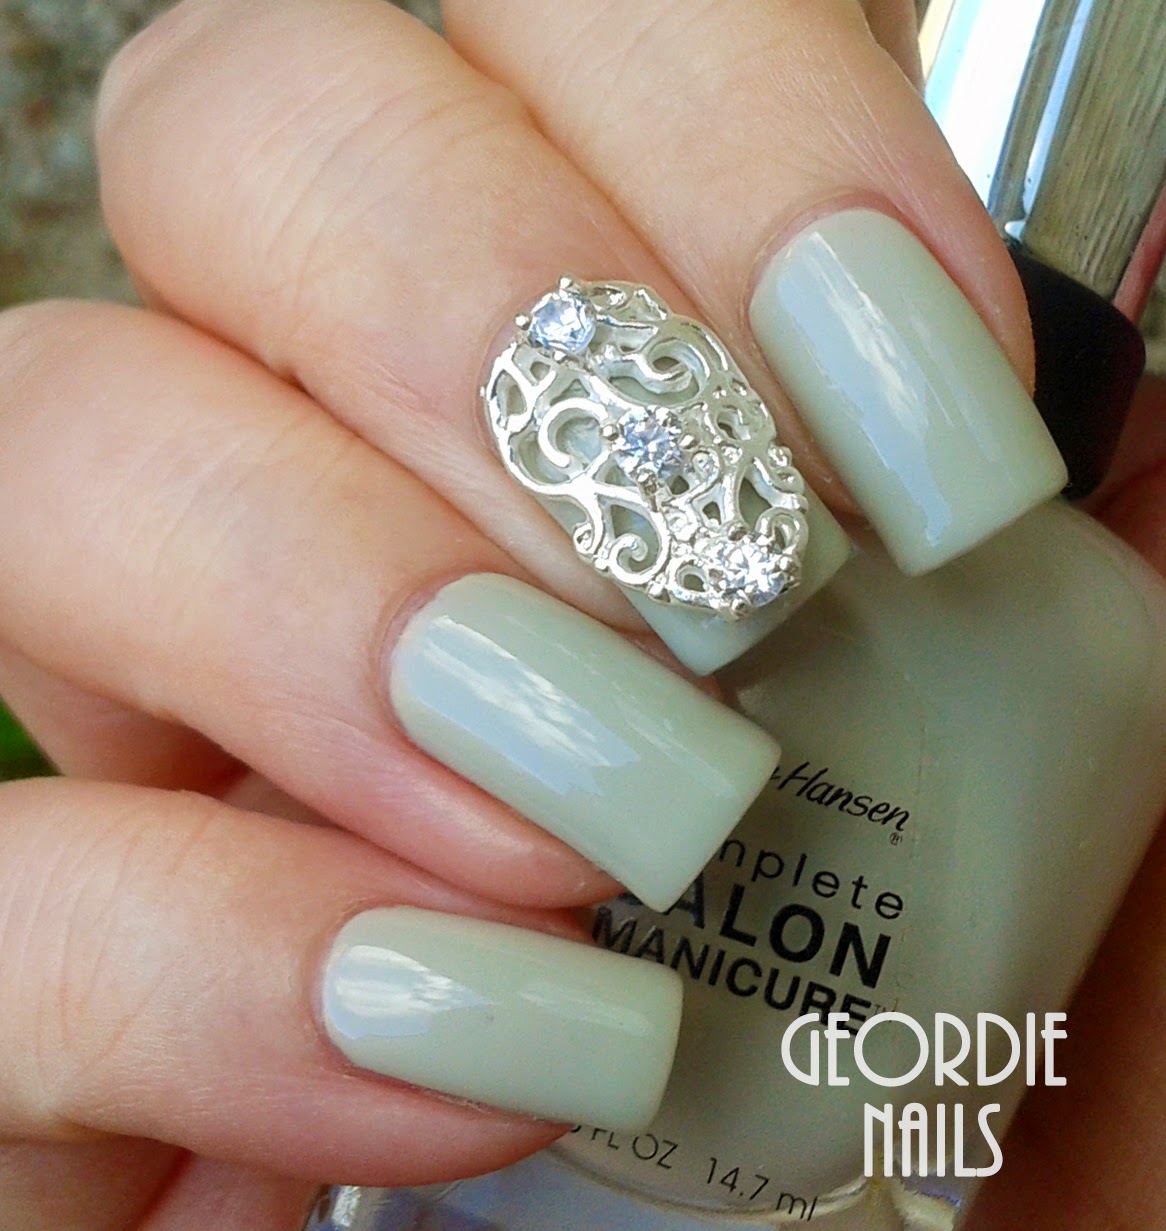
Today's manicure is a simple pale grey with a very special accent nail! I own a pair of charms that are full-nail covers in a silver filigree design with diamantés, so I put one on my right middle fingernail for a bit of luxury. The polish is Ion by Sally Hansen and here it is:
It feels very special and indulgent (even though they were cheap from Born Pretty Store!) ^_^
I actually wanted to use the charm because I was thinking about cutting my nails shorter just for a change... but now I've remembered another manicure I wanted to do first so you'll be seeing at least one more blog post before I go short!
Hugs,
Lisa xx
Today's manicure is a simple pale grey with a very special accent nail! I own a pair of charms that are full-nail covers in a silver filigree design with diamantés, so I put one on my right middle fingernail for a bit of luxury. The polish is Ion by Sally Hansen and here it is:
It feels very special and indulgent (even though they were cheap from Born Pretty Store!) ^_^
I actually wanted to use the charm because I was thinking about cutting my nails shorter just for a change... but now I've remembered another manicure I wanted to do first so you'll be seeing at least one more blog post before I go short!
Hugs,
Lisa xx
Saturday, 11 April 2015
Princess Manicure
Hello!
During the week I had a look in Poundland and they had sets of little nail charms that I couldn't resist buying to try out! They came in packs of 6 assorted silver diamanté designs and I bought two different sets.
The charm I picked out to use first was a sweet little crown. I set it as the centrepiece of a skittles manicure using the pink Seventeen Sweet Kisses, the grey Seventeen Chaperone and the off-white Sally Hansen Lavender Cloud with a glitter gradient done with Models Own Pink Fizz.
I really adored the way this looked, especially for the price. At 6 for £1 they're a huge bargain.
I've never used nail charms before and so I didn't have any nail glue to secure it down. As such I just set it in top coat and it did come off after a few hours! Fortunately I have a Born Pretty Store order on the way with some glue and a couple more charms.
Hugs,
Lisa xx
During the week I had a look in Poundland and they had sets of little nail charms that I couldn't resist buying to try out! They came in packs of 6 assorted silver diamanté designs and I bought two different sets.
The charm I picked out to use first was a sweet little crown. I set it as the centrepiece of a skittles manicure using the pink Seventeen Sweet Kisses, the grey Seventeen Chaperone and the off-white Sally Hansen Lavender Cloud with a glitter gradient done with Models Own Pink Fizz.
I really adored the way this looked, especially for the price. At 6 for £1 they're a huge bargain.
I've never used nail charms before and so I didn't have any nail glue to secure it down. As such I just set it in top coat and it did come off after a few hours! Fortunately I have a Born Pretty Store order on the way with some glue and a couple more charms.
Hugs,
Lisa xx
Labels:
Models Own,
nail art,
Poundland,
Sally Hansen,
Seventeen
Wednesday, 3 September 2014
Dozy Owls!
Hello!
Today I have for you some more of my YRNails owl purchases, this time the sleepy purple Dozy Owls!
To complement the decals I painted my nails a matching purple with Essie To Buy Or Not To Buy, except for a couple of accent nails which I painted with Sally Hansen Lavender Cloud and applied the owls on top!
Hoot hoot!
Hugs,
Lisa xx
Today I have for you some more of my YRNails owl purchases, this time the sleepy purple Dozy Owls!
To complement the decals I painted my nails a matching purple with Essie To Buy Or Not To Buy, except for a couple of accent nails which I painted with Sally Hansen Lavender Cloud and applied the owls on top!
Hoot hoot!
Hugs,
Lisa xx
Labels:
Essie,
nail art,
Sally Hansen,
water decals,
YRNails
Monday, 4 August 2014
Inkwell Manicure
Hello!
Today's manicure is a two-nail accent design in monochrome which I'm really quite happy with! It uses two nail art techniques, stamping and clingfilm.
For my base manicure I applied two coats of Lavender Cloud by Sally Hansen. On my ring fingers I stamped the text design from MoYou plate Princess 11. On my middle fingers I used the clingfilm (also called Saran Wrap) technique: once my base colour was dry I added a coat of black and, while that was still wet, I dabbed at it with clingfilm to get the mottled ink effect. Top coat glossed everything over!
Hugs,
Lisa xx
Today's manicure is a two-nail accent design in monochrome which I'm really quite happy with! It uses two nail art techniques, stamping and clingfilm.
For my base manicure I applied two coats of Lavender Cloud by Sally Hansen. On my ring fingers I stamped the text design from MoYou plate Princess 11. On my middle fingers I used the clingfilm (also called Saran Wrap) technique: once my base colour was dry I added a coat of black and, while that was still wet, I dabbed at it with clingfilm to get the mottled ink effect. Top coat glossed everything over!
Hugs,
Lisa xx
Friday, 16 May 2014
Vintage Floral & Birds Manicure
Hello!
Yesterday I reviewed a nail decal sheet from Born Pretty Store, which you can read here:
http://geordienails.blogspot.co.uk/2014/05/vintage-floral-nail-stamps.html
For this post I've added to the original manicure with some stamping! I ordered two new plates from Moyou as a get-well present to myself, and one of them was Kitty 11 with its array of beautiful birdcages. I stamped a cage onto my middle nail plus a couple more little birdies across the mani :-)
Hugs,
Lisa xx
Yesterday I reviewed a nail decal sheet from Born Pretty Store, which you can read here:
http://geordienails.blogspot.co.uk/2014/05/vintage-floral-nail-stamps.html
For this post I've added to the original manicure with some stamping! I ordered two new plates from Moyou as a get-well present to myself, and one of them was Kitty 11 with its array of beautiful birdcages. I stamped a cage onto my middle nail plus a couple more little birdies across the mani :-)
Hugs,
Lisa xx
Labels:
Born pretty store,
MoYou,
nail art,
Sally Hansen,
stamping,
water decals
Thursday, 15 May 2014
Vintage Floral Nail Stamps
This post contains products which were sent to me for review :-)
Hello!
Today I'm showing you a new kind of water decal from Born Pretty Store. It's called a Nail Stamp and comes as a little patterned sheet that you can cut and use as you like, and I received a very pretty vintage floral design.
This decal applies like a temporary tattoo which is really cool! You stick the design face down onto your nail and wet the backing paper before sliding it off. This makes for accurate application and the decal adheres extremely well and smoothly to the nail.
The size of the decal itself is really quite small so it's definitely more for accent nails and nail art than for a full manicure. I decided to do one full nail plus a circle of the pattern on my ring finger, an idea which I ended up loving. I applied them over a pale pink, Sally Hansen Crinoline.
http://www.bornprettystore.com/nail-stamp-water-decals-transfers-sticker-gorgeous-penoy-vine-pattern-6198-0816198-p-14398.html
The size is definitely a downside and I was a little surprised when I received it! That said, I honestly like the pattern and quality of the decal and I might just shell out the $2.45 for another design or a refill of this one. I would cut it into circles again to get the most out of the sheet.
As always you can get 10% off your Born Pretty Store order with my coupon code, CMBQ10 :
I'm also going to add to this mani with some birdcage stamping, be back with it soon!
Hugs,
Lisa xx
Hello!
Today I'm showing you a new kind of water decal from Born Pretty Store. It's called a Nail Stamp and comes as a little patterned sheet that you can cut and use as you like, and I received a very pretty vintage floral design.
This decal applies like a temporary tattoo which is really cool! You stick the design face down onto your nail and wet the backing paper before sliding it off. This makes for accurate application and the decal adheres extremely well and smoothly to the nail.
The size of the decal itself is really quite small so it's definitely more for accent nails and nail art than for a full manicure. I decided to do one full nail plus a circle of the pattern on my ring finger, an idea which I ended up loving. I applied them over a pale pink, Sally Hansen Crinoline.
http://www.bornprettystore.com/nail-stamp-water-decals-transfers-sticker-gorgeous-penoy-vine-pattern-6198-0816198-p-14398.html
And here I'm showing you the second Nail Stamp I received for review, to show you the size:
As always you can get 10% off your Born Pretty Store order with my coupon code, CMBQ10 :
I'm also going to add to this mani with some birdcage stamping, be back with it soon!
Hugs,
Lisa xx
Labels:
Born pretty store,
nail art,
Sally Hansen,
water decals
Saturday, 3 May 2014
Seventeen Off The Wall Metals Nail Effects ~ Bronze
Hello!
Today I tried out the third of Seventeen's new ranges - see Crushed Foils and Juicy Neons - and this one is called Off The Wall Metals. It comes in gold, silver and bronze and I bought the bronze. I paid £3.99 but Boots had a 3 for 2 offer on as well :-)
This polish is a glitter topper comprising different sizes of black and white hex glitter mixed in with bronze metallic shards. As with other glitter top coats I've bought from Seventeen, the glitter density is just right; I didn't have to do any fishing or adjust the glitter on my nails at all. Here are two coats over a latte base, Without A Stitch by Sally Hansen:
It's a very rock look and it's not entirely me, but I would have loved it when I was... well, seventeen! My style is more girly now but I was a goth back in the day. It's a good quality polish.
This will be my last long-nail post for a little while: I'll be chopping them short and painting them with one last manicure before I have my gallbladder operation on Wednesday. Eek!
Hugs,
Lisa xx
Today I tried out the third of Seventeen's new ranges - see Crushed Foils and Juicy Neons - and this one is called Off The Wall Metals. It comes in gold, silver and bronze and I bought the bronze. I paid £3.99 but Boots had a 3 for 2 offer on as well :-)
This polish is a glitter topper comprising different sizes of black and white hex glitter mixed in with bronze metallic shards. As with other glitter top coats I've bought from Seventeen, the glitter density is just right; I didn't have to do any fishing or adjust the glitter on my nails at all. Here are two coats over a latte base, Without A Stitch by Sally Hansen:
It's a very rock look and it's not entirely me, but I would have loved it when I was... well, seventeen! My style is more girly now but I was a goth back in the day. It's a good quality polish.
This will be my last long-nail post for a little while: I'll be chopping them short and painting them with one last manicure before I have my gallbladder operation on Wednesday. Eek!
Hugs,
Lisa xx
Friday, 21 February 2014
Purple Skittles Manicure
Hello!
I love skittles manicures ~ creative combinations of colours and nail art with each nail being different ~ and there are so many inspiring people on Instagram doing them! I've "hearted" lots of them as I try to come up with my own ideas. After my simple pastel polka dot skittles I decided to do a purple mix using mostly Models Own polishes :-)
On my index and pinky fingers is Models Own's Blueberry Muffin. The stamping is Models Own's Cornflower Gleam over Sally Hansen's Lavender Cloud, using MoYou plate Princess 11. And the glitter is Models Own's Southern Lights ~ on my thumb I sponged it on as a gradient!
Hugs,
Lisa xx
I love skittles manicures ~ creative combinations of colours and nail art with each nail being different ~ and there are so many inspiring people on Instagram doing them! I've "hearted" lots of them as I try to come up with my own ideas. After my simple pastel polka dot skittles I decided to do a purple mix using mostly Models Own polishes :-)
On my index and pinky fingers is Models Own's Blueberry Muffin. The stamping is Models Own's Cornflower Gleam over Sally Hansen's Lavender Cloud, using MoYou plate Princess 11. And the glitter is Models Own's Southern Lights ~ on my thumb I sponged it on as a gradient!
Hugs,
Lisa xx
Labels:
Models Own,
MoYou,
nail art,
Sally Hansen,
stamping
Monday, 17 February 2014
Pastel Polka Dots
Hello!
I just cut my nails yesterday so wanted to show them to their best with a cute short-nail mani. I went with pale pastel skittles and polka dots since Spring is nearly around the corner (maybe... hopefully... please??)
The polka dots are stamped with this plate from KKCenterHk and the colours are as follows:
Thumb - Woo Me by Boots 17
Index - Blueberry Muffin by Models Own
Middle - Shore Thing by Essie
Ring - Lavender Cloud by Sally Hansen
Pinky - Sweet Kisses by Boots 17
I wish the weather was a little more cheery to match my nails... they don't really go with dreary skies and chilly air!
Hugs,
Lisa xx
I just cut my nails yesterday so wanted to show them to their best with a cute short-nail mani. I went with pale pastel skittles and polka dots since Spring is nearly around the corner (maybe... hopefully... please??)
The polka dots are stamped with this plate from KKCenterHk and the colours are as follows:
Thumb - Woo Me by Boots 17
Index - Blueberry Muffin by Models Own
Middle - Shore Thing by Essie
Ring - Lavender Cloud by Sally Hansen
Pinky - Sweet Kisses by Boots 17
I wish the weather was a little more cheery to match my nails... they don't really go with dreary skies and chilly air!
Hugs,
Lisa xx
Labels:
17,
Essie,
KKcenterhk,
Models Own,
nail art,
Sally Hansen,
stamping
Thursday, 13 February 2014
Floating Feather Manicure
This post contains products which were sent to me for review :-)
Hello!
This is one of those posts where I get to wear a manicure using beautiful nail art decals that I would have bought myself if I hadn't been sent them for review. Born Pretty Store have a listing featuring various designs of feather water decals to choose from; I was sent a sheet of 20 dreamy, fluffy feathers in blue, pink and black with a delicate stem of gold glitter.
For my base colour I used Sally Hansen's Crinoline which is the palest pink ever - the decals are slightly transparent so I think a lighter polish would suit them best. I chose a feather for each nail and positioned them after dipping them in water for about 30-60 seconds, then finished with top coat.
You can find all the feather decals here, currently at 99c per sheet:
http://www.bornprettystore.com/sheet-catching-flying-colored-feather-pattern-nail-water-decals-transfers-sticker-p-10985.html
And here they are!
I don't want to sound spammy (I do, I know), but I genuinely love these so much that I'm going to go back and buy some more for myself. I'm grateful that I got to try them and I hope you like them too! If you get tempted you can use my discount code CMBQ10 for 10% off:
Hugs,
Lisa xx
Hello!
This is one of those posts where I get to wear a manicure using beautiful nail art decals that I would have bought myself if I hadn't been sent them for review. Born Pretty Store have a listing featuring various designs of feather water decals to choose from; I was sent a sheet of 20 dreamy, fluffy feathers in blue, pink and black with a delicate stem of gold glitter.
For my base colour I used Sally Hansen's Crinoline which is the palest pink ever - the decals are slightly transparent so I think a lighter polish would suit them best. I chose a feather for each nail and positioned them after dipping them in water for about 30-60 seconds, then finished with top coat.
You can find all the feather decals here, currently at 99c per sheet:
http://www.bornprettystore.com/sheet-catching-flying-colored-feather-pattern-nail-water-decals-transfers-sticker-p-10985.html
And here they are!
Close-up:
I don't want to sound spammy (I do, I know), but I genuinely love these so much that I'm going to go back and buy some more for myself. I'm grateful that I got to try them and I hope you like them too! If you get tempted you can use my discount code CMBQ10 for 10% off:
Hugs,
Lisa xx
Labels:
Born pretty store,
nail art,
Sally Hansen,
water decals
Monday, 10 February 2014
Cinderella Decals!
This post contains products which were sent to me for review :-)
Hello!
Today I have for you some adorable Cinderella water decals from KKCenterHk! They have a range of Disney decals in their Cartoon section that I'd been eyeing up for a while, and the elegance and flowing blue dress of Cinderella caught me.
First of all I have to apologise because these decals were very hard to photograph! In the flesh they are very detailed, down to Cinderella's tiny facial features. I used the decals over two different colours, here they are:
Sally Hansen - Lavender Cloud (purple-tinted white)
OPI - I Vant To Be A-Lone Star (frosted Cinderella blue)
Isn't she pretty?! I think the decals definitely look better over white.
I had to be very careful with the decals while I was applying them to my nail, just because Cinderella's head and torso are quite small ~ one got broken, but I learnt quickly how to apply them delicately. Cinderella is one of my favourite Disney films of all time and I'm so glad I got to wear the princess on my nails ^_^
Hugs,
Lisa xx
Hello!
Today I have for you some adorable Cinderella water decals from KKCenterHk! They have a range of Disney decals in their Cartoon section that I'd been eyeing up for a while, and the elegance and flowing blue dress of Cinderella caught me.
First of all I have to apologise because these decals were very hard to photograph! In the flesh they are very detailed, down to Cinderella's tiny facial features. I used the decals over two different colours, here they are:
Sally Hansen - Lavender Cloud (purple-tinted white)
OPI - I Vant To Be A-Lone Star (frosted Cinderella blue)
Isn't she pretty?! I think the decals definitely look better over white.
I had to be very careful with the decals while I was applying them to my nail, just because Cinderella's head and torso are quite small ~ one got broken, but I learnt quickly how to apply them delicately. Cinderella is one of my favourite Disney films of all time and I'm so glad I got to wear the princess on my nails ^_^
Hugs,
Lisa xx
Labels:
KKcenterhk,
nail art,
OPI,
Sally Hansen,
water decals
Monday, 3 February 2014
Bouquet Manicure
Hello!
Today's mani is inspired by the bouquet of flowers currently in our living room! It's a Spring brights bouquet with deep green leaves and pops of yellow, pink and purple flowers.
As a base I painted Sally Hansen's Lavender Cloud and for the stamping I used various flowery bits from MoYou Mother Nature plate 05. I added in some yellow with a dotting tool. It's a bit messy, but here it is!
To be honest the leaves looked good on their own ~ I'll definitely be revisiting this mani without the flowers! It does look nice and pretty from a distance though, and the colours are cheering...
Hugs,
Lisa xx
Today's mani is inspired by the bouquet of flowers currently in our living room! It's a Spring brights bouquet with deep green leaves and pops of yellow, pink and purple flowers.
As a base I painted Sally Hansen's Lavender Cloud and for the stamping I used various flowery bits from MoYou Mother Nature plate 05. I added in some yellow with a dotting tool. It's a bit messy, but here it is!
To be honest the leaves looked good on their own ~ I'll definitely be revisiting this mani without the flowers! It does look nice and pretty from a distance though, and the colours are cheering...
Hugs,
Lisa xx
Monday, 27 January 2014
AiS Sunday Challenge ~ Three Purples!
Hello!
This is a little late, but here we are! This week's Adventures in Stamping Sunday challenge was to create a manicure using three purples.
For my base I did a three-purple sponged gradient using Sally Hansen's Lavender Cloud, Nails Inc's Bluebell and Models Own's Pukka Purple. I'm still learning how to do gradients so it isn't perfect, but I feel like I'm improving!
For the stamping I once again broke out my MoYou Mother Nature plates 01 and 05. In black I stamped birds and butterflies, then in white and purple to contrast the gradient I added a rose pattern. Here it is...
Hugs,
Lisa xx
This is a little late, but here we are! This week's Adventures in Stamping Sunday challenge was to create a manicure using three purples.
For my base I did a three-purple sponged gradient using Sally Hansen's Lavender Cloud, Nails Inc's Bluebell and Models Own's Pukka Purple. I'm still learning how to do gradients so it isn't perfect, but I feel like I'm improving!
For the stamping I once again broke out my MoYou Mother Nature plates 01 and 05. In black I stamped birds and butterflies, then in white and purple to contrast the gradient I added a rose pattern. Here it is...
Hugs,
Lisa xx
Labels:
challenges,
Models Own,
MoYou,
nail art,
Nails Inc.,
Sally Hansen,
stamping
Sunday, 19 January 2014
AiS Sunday Challenge ~ Inspired by Fabric
Hello!
Today I'm taking part in the Adventures in Stamping Sunday nail art challenge. This week the theme is "inspired by fabric". Well, I looked down and there was my fresh quilt cover with lovely grey swirls and accents of black and fuchsia! I practically live in my bed so it probably deserves a tribute at this point ;-)
My base colour is Sally Hansen's Lavender Cloud, and for the stamping I used the swirl pattern on Bundle Monster plate BM-314 and Essie's Blue Rhapsody. I dotted on black and hot fuschia to finish the mani.
...and here is the quilt cover in question:
I can't wait to see everyone else's ideas!
Hugs,
Lisa xx
Today I'm taking part in the Adventures in Stamping Sunday nail art challenge. This week the theme is "inspired by fabric". Well, I looked down and there was my fresh quilt cover with lovely grey swirls and accents of black and fuchsia! I practically live in my bed so it probably deserves a tribute at this point ;-)
My base colour is Sally Hansen's Lavender Cloud, and for the stamping I used the swirl pattern on Bundle Monster plate BM-314 and Essie's Blue Rhapsody. I dotted on black and hot fuschia to finish the mani.
...and here is the quilt cover in question:
I can't wait to see everyone else's ideas!
Hugs,
Lisa xx
Labels:
Bundle Monster,
challenges,
Essie,
nail art,
Sally Hansen,
stamping
Saturday, 4 January 2014
Black & Pink Rose Manicure
Hello!
I did this manicure for the Adventures in Stamping Sunday challenge, which is "Your Favourite Flower". I'm posting it a day early as I'll be launching the Nailz Craze Giveaway tomorrow!
I've had this manicure by LauRobles pinned to my inspiration board on Pinterest for ages, but until now I hadn't had a suitably romantic rose pattern to do my own version. Now I do! I painted a base colour of Sally Hansen's Crinoline with accent ring fingers of black, then used the trailing roses from MoYou's Mother Nature plate 05:
I'm so glad I've finally been able to rock this mani! It received two compliments when I made it out to town yesterday which made me a very happy Lisa ^_^
See you tomorrow for the giveaway!
Hugs,
Lisa xx
I did this manicure for the Adventures in Stamping Sunday challenge, which is "Your Favourite Flower". I'm posting it a day early as I'll be launching the Nailz Craze Giveaway tomorrow!
I've had this manicure by LauRobles pinned to my inspiration board on Pinterest for ages, but until now I hadn't had a suitably romantic rose pattern to do my own version. Now I do! I painted a base colour of Sally Hansen's Crinoline with accent ring fingers of black, then used the trailing roses from MoYou's Mother Nature plate 05:
I'm so glad I've finally been able to rock this mani! It received two compliments when I made it out to town yesterday which made me a very happy Lisa ^_^
See you tomorrow for the giveaway!
Hugs,
Lisa xx
Subscribe to:
Posts (Atom)